Markers#
The markers module manages and displays in game markers that are displayed in the 3D scene and can be used to help guide the player through the GW2 world.
Terminology#
While users of BlishHUD, TacO, and other overlays should be familiar with the terms used below, including the name of this module (‘markers’), the following terms are documented to remove any ambiguity.
- Category:
A category is a grouping of markers, trails, and even other categories.
Categories are analogous to file system folders. Every marker or trail must exist in a category. Markers and trails are generally managed by the category (i.e. an entire category is shown or hidden).
- Marker:
A marker represents a single point within the GW2 world. TacO users may call markers POIs.
- Trail:
A trail represents a path along multiple points within the GW2 world.
Quick Start#
Most of the markers module functionality can be controlled from the Category Manager window.
The Category Manager can be shown by selecting the ‘Marker’s item in the
EG-Overlay menu, which can be shown by pressing ctrl-shift-e by default.
See also
See the overlay-menu module for more details on the
overlay menu.
Importing TacO Marker Packs#
The markers module uses its own marker package format, but popular TacO marker packs can be imported.
See also
See EG-Overlay Markerpack Format for details on the EG-Overlay Marker Package format.
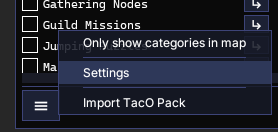
First, open the Category Manager as described above, then click the menu button on the bottom of the window and select ‘Import TacO Pack’:

This will open the TacO Import Wizard:
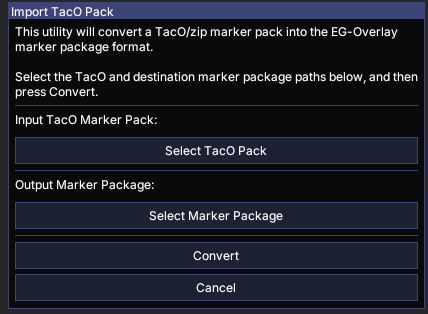
Click ‘Select TacO Pack’ to select the TacO pack to import. This will open an Open File dialog:
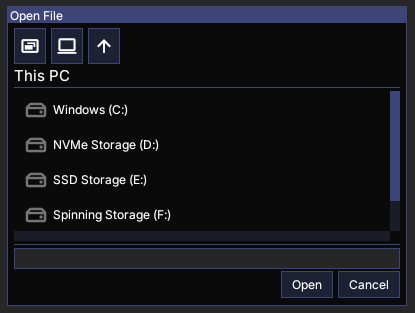
Navigate to the TacO pack file and click ‘Open.’
Tip
The two buttons at the top of the Open File dialog next to the ‘Up’ button will navigate to the Desktop and This PC.
Once a TacO pack is selected both the ‘Input Taco Marker Pack’ and ‘Output Marker Package’ values will be updated.
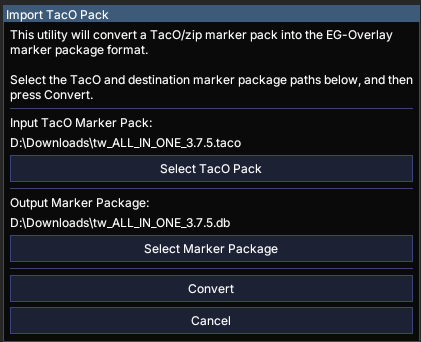
The ‘Output Marker Package’ will be chosen automatically based on the path of the input TacO pack. You can change it by clicking ‘Select Marker Package.’
Once both input and output files are selected, click ‘Convert.’ This will close the wizard window an open a new window that shows the progress of the conversion.

Once the conversion is complete, click the ‘OK’ button to close the window.
Adding Marker Packages#
Marker packages that have been converted or downloaded can be added in the settings window.
Open the settings window by selecting ‘Settings’ from the Category Manager window menu:
This will open the settings window:
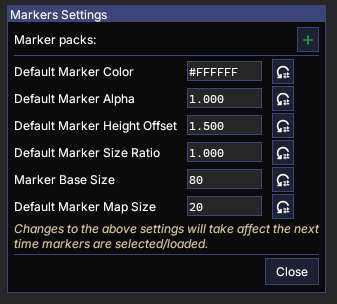
Marker packages can be added by clicking the green ‘+’ next to ‘Marker packs’ and using the Open File dialog to navigate to the maker package file.
Multiple marker packages can be added by repeating this process. Marker packages can later be removed by clicking the red ‘-’ next to the package in the settings window.
Warning
Once a marker package is added or removed the Category Manager window will automatically update, and any active markers in the newly added package will be loaded.
Most marker packs default all categories to active, meaning that all markers in the current map will be loaded whenever a new marker package is added for the first time.
When this occurs, it may take several seconds for the loading to complete, but the overlay including the Category Manager window should still be usable.
Once all of the markers have been loaded all categories except those that you wish to be displayed can be turned off.
Once all marker packs have been added, click ‘Close’ to close the settings window.
Category Manager#
The Category Manager allows the user to control what categories, and therefore which markers and trails, are visible.
Since categories may be arranged in a complex hierarchy, the Category Manager window allows the user to navigate to different categories, similar to a file folder structure.
The Category Manager window is made up of 3 sections:
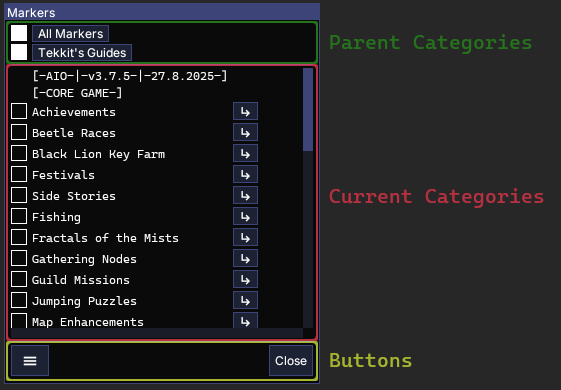
Parent Categories#
The Category Manager can be navigated to a parent category by clicking on the corresponding button in the parent categories section of the window. The ‘All Markers’ category is a root category that always exists and will display all root categories from all marker packages.
Visibility of parent categories, including ‘All Markers’ can be controlled by toggling the check box next to the corresponding category button.
Current Categories#
The main section of the window displays the current categories, those that are the direct children of the last category in the Parent Categories section.
Category visibility can be controlled by toggling the check box next to the corresponding category name.
The children of a category can be viewed by navigating to it, by pressing the arrow button next to the corresponding category name.